
Practical ophthalmic procedures vol. 4 teaching set. Full text
Remember
Before performing any eye procedure
- Wash your hands (and afterwards too)
- Position the patient comfortably with head supported
- Avoid distraction for yourself and the patient
- Ensure good lighting
- Always explain to the patient what you are going to do
1. Staining the cornea (1)
Indications
To assess the cornea
– following trauma
– in patients with ‘dry eye’ problems
using diagnostic drops, e.g., Fluorescein 2% or Rose Bengal 1%
2. Staining the cornea (2)
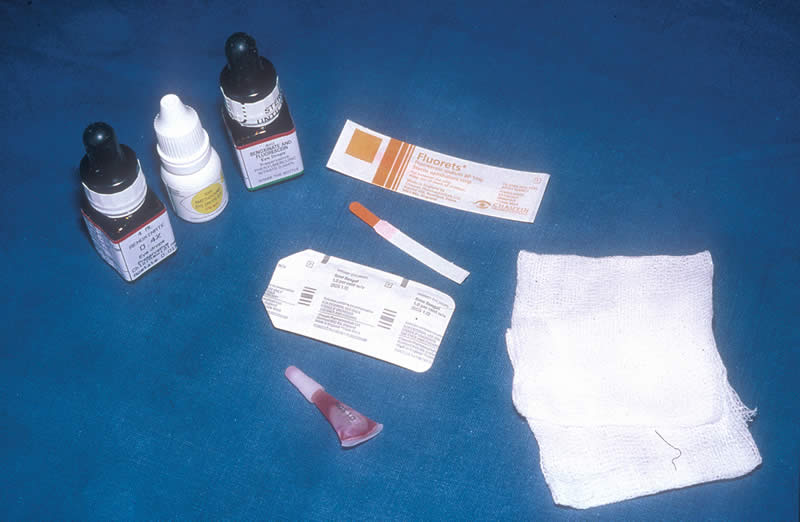
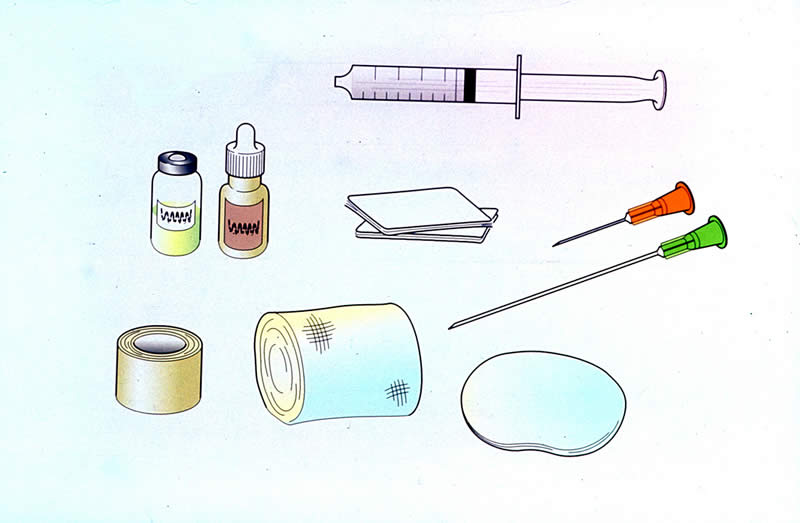
You will need
- Diagnostic drops – Fluorescein 2% or Rose Bengal 1%
- Fluorescein strips
- Normal saline drops
- Local anaesthetic drops
- Clean cotton wool or gauze swabs
Plus:
- Torch or Slit Lamp (depending on availability/skill level) for illumination
3. Staining the cornea (3)
Preparation
- Explain to the patient that he/she will experience a stinging sensation when the drops are instilled
Method
- Ask the patient to look up and instill the anaesthetic drops and the diagnostic Fluorescein or Rose Bengal drops (this procedure is explained in Practical Ophthalmic Procedures – Volume One), or use the paper strips
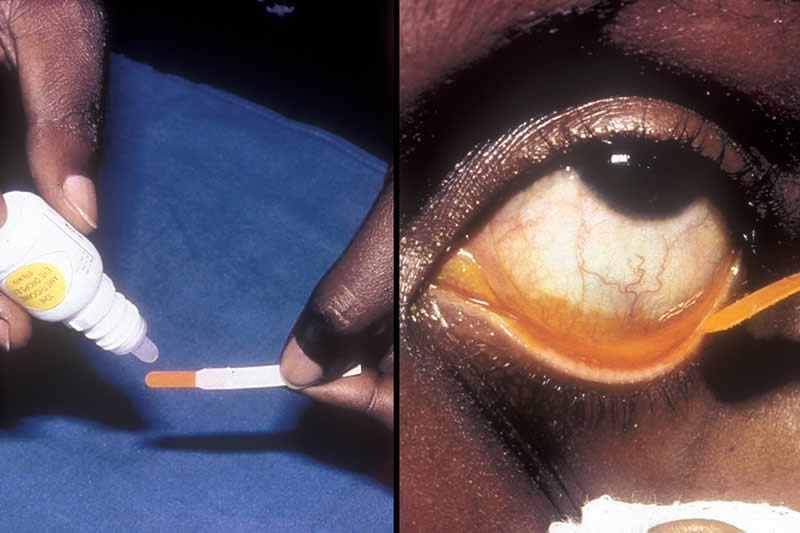
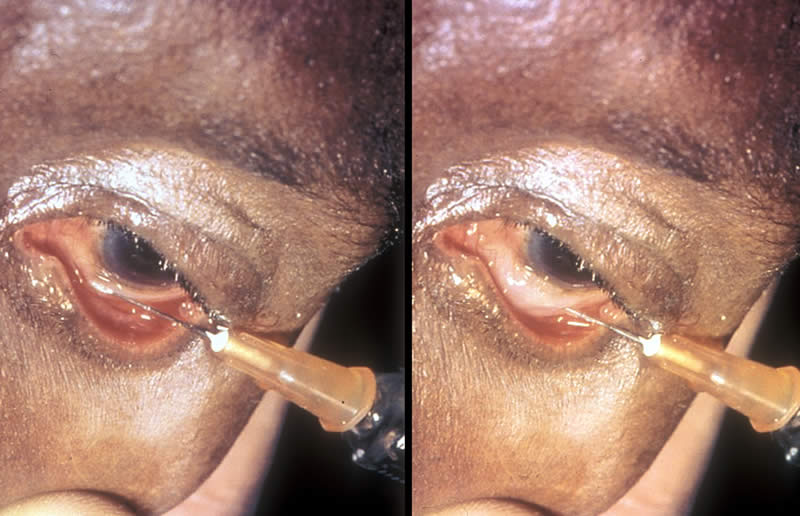
Left picture:
- When using the strips, moisten with a small amount of normal saline or anaesthetic drop, taking care not to touch the end of the strip (impregnated with the dye) with the dropper
Right picture:
- Ask the patient to look up and gently touch the inside of the lower eyelid with the moistened strip, taking care not to touch the cornea
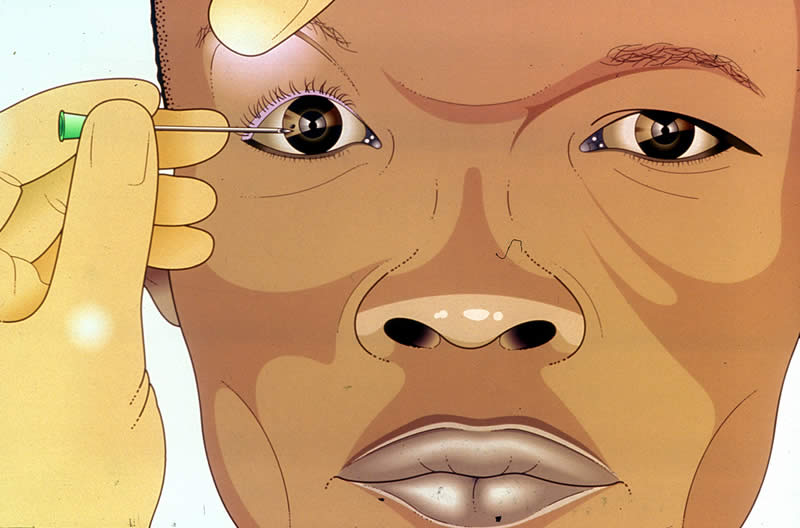
4. Staining the cornea (4)
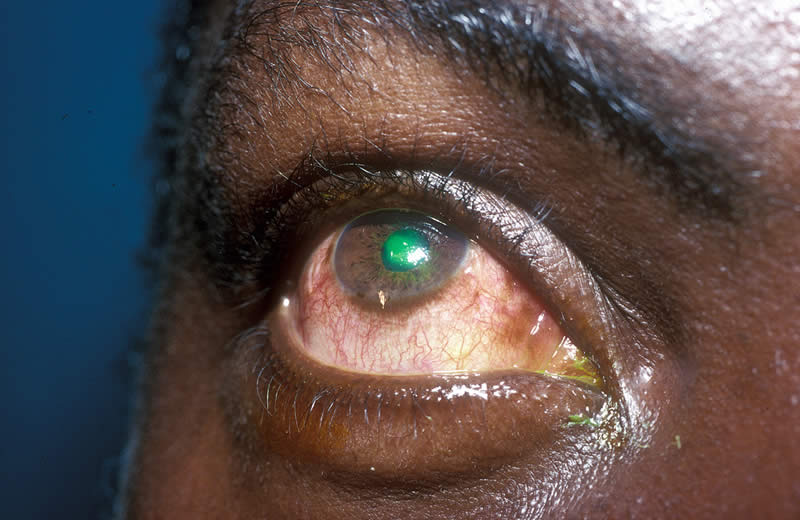
Ask the patient to close the eye, gently wipe away any surplus fluid and wait about 30 seconds.
Using a torch or Slit Lamp with the appropriate colour light (blue light, if using Fluorescein and white light, if using Rose Bengal), examine the corneal surface, note any staining and record in patient’s documentation.
Fluorescein stains green indicating corneal epithelial loss (see picture) Rose Bengal stains red indicating dead tissue and mucus filaments
5. Schiötz tonometry (1)
Indications
To measure intraocular pressure
6. Schiötz tonometry (2)

You will need
- Schiötz tonometer, weights and scale card
- Local anaesthetic drops
- Clean cotton wool or gauze swabs
- Isopropyl alcohol 70% (methylated spirit) or impregnated ‘Mediswabs’
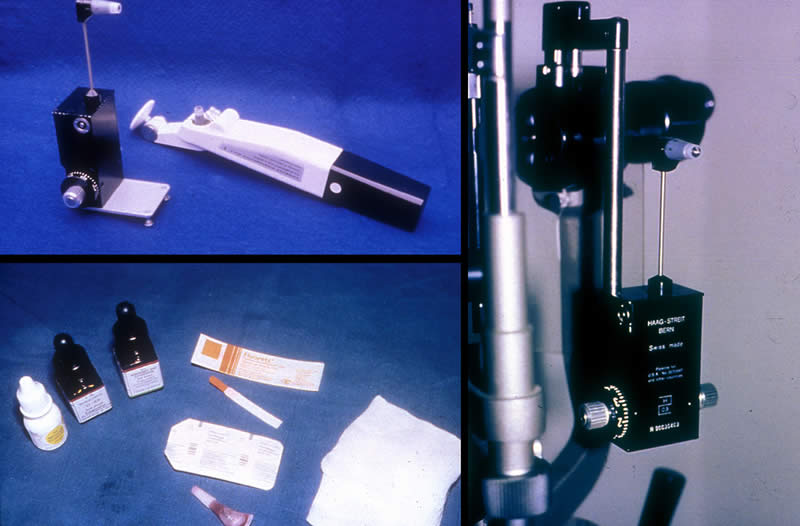
7. Schiötz tonometry (3)

Preparation
Top left picture:
- Test the tonometer using the spherical mould in the box. Use the standard weight of 5.5 grams for this test. The pointer should immediately reach the ‘0’ marking.
Bottom left picture:
- Clean the plunger and disc of the tonometer using spirit and swabs or a ‘Mediswab’ and wipe dry with cotton wool or gauze swabs
- Lie the patient flat with his/her head supported on a pillow
Method
- Instill local anaesthetic drops (this procedure is explained in Practical Ophthalmic Procedures – Volume One) and wait about 30 seconds
Right picture:
- Ask the patient to look at a fixed object (his/her own thumb held directly above their gaze may help) and to keep absolutely still
8. Schiötz tonometry (4)

Top left picture:
This position is wrong – the health worker is in an awkward position and consequently the tonometry reading may be inaccurate
Top right picture:
This position is correct – note the good posture of the health worker
Bottom left picture:
- With the thumb and index finger, gently hold open the patient’s eyelids, taking care not to put any pressure on the globe
- With the other hand, hold the tonometer between the thumb and index finger, place the plunger on the central cornea and allow the disc to lower gently onto the corneal surface.
NOTE: This manoeuvre will cause the dial to register on the tonometer scale – note this reading
- Remove the tonometer and allow the eyelids to close gently
- Tell the patient not to rub the eye – the anaesthetic will last for about 5 minutes
- Clean the tonometer again and store safely in the box
Bottom right picture:
- Use the scale card to interpret the noted reading and record the intraocular pressure in the patient’s documentation
9. Applanation tonometry (1)
Indications
To measure intraocular pressure
10. Applanation tonometry (2)
You will need
- Tonometer – Goldmann (used on Slit Lamp) or Perkins (hand-held)
- Applanation prism
- Local anaesthetic drops
- Fluorescein strips
- Clean cotton wool or gauze swab
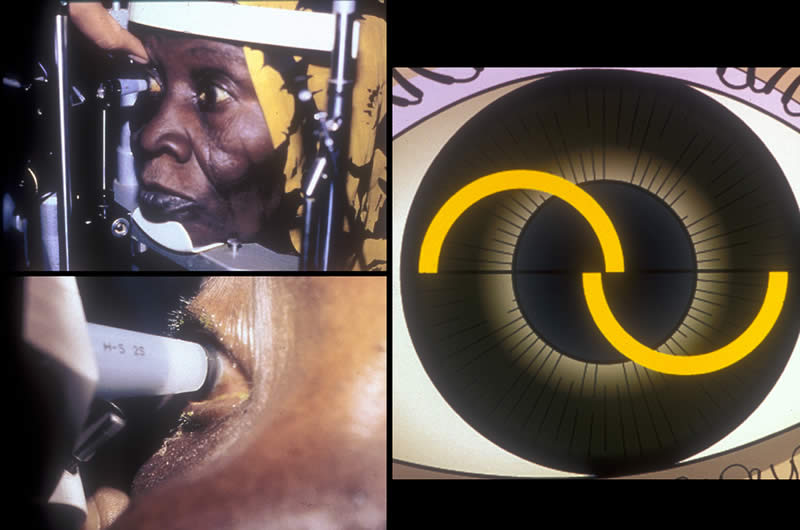
11. Applanation tonometry (3)

Preparation
- Ensure the prism has been previously sterilized with Isopropyl Alcohol 70% (methylated spirit) or Sodium Hypochlorite and wiped dry
- Check that the graduation marked ‘0’ on the prism is aligned with the white marker point on the tonometer
- Check the calibrated dial of the tonometer is set at 10mm Hg
- Position the patient comfortably at the Slit Lamp (or in a chair with head supported, if using the Perkins tonometer)
Picture left:
This position is wrong – note that the patient is too far away from the Slit Lamp and has to lean forward
Picture right:
This position is correct – note that the patient is sitting upright
IMPORTANT!
The patient’s comfort is vital to ensure cooperation.
The Slit Lamp has a facility for adapting to the correct level for each patient.
The patient must be seated at the correct level, close up to the Slit Lamp, with his/her forehead against the white bar and chin firmly on the rest.
The examiner, too, must be comfortable and his/her seating height should also be adjusted.
12. Applanation tonometry (4)
Method
- Instill the local anaesthetic drops and then Fluorescein (this procedure is explained in Practical Ophthalmic Procedures – Volume One)
- Ask the patient to look straight ahead, open both eyes wide, fix his/her gaze and keep perfectly still
Top left picture:
- With the thumb, gently hold up the patient’s top eyelid, taking care not to put any pressure on the globe
- Direct the blue light from the Slit Lamp or the Perkins tonometer onto the prism head
Bottom left picture:
- Move the tonometer forward slowly until the prism rests gently on the patient’s corneal surface
Picture right:
- Turn the calibrated dial on the tonometer until the two Fluorescein semi-circles in the prism head are seen to meet and form a horizontal ‘S’ shape
IMPORTANT!
This must be precise – note that it is the inside edges of the two semi-circles which must meet for the reading to be accurate
- Note the reading on the measuring dial
- Withdraw the prism from the corneal surface
- Wipe the prism and return it to the receptacle containing the sterilizing fluid
- Record the intraocular pressure reading in the patient’s documentation
13. Lacrimal syringing (1)
Indications
- To check the naso-lacrimal passage for any blockage
- To flush out debris, e.g., lacrimal passage infection
This technique is also suitable for administering antibiotics to the lacrimal passages and for introducing dye for X-ray
14. Lacrimal syringing (2)
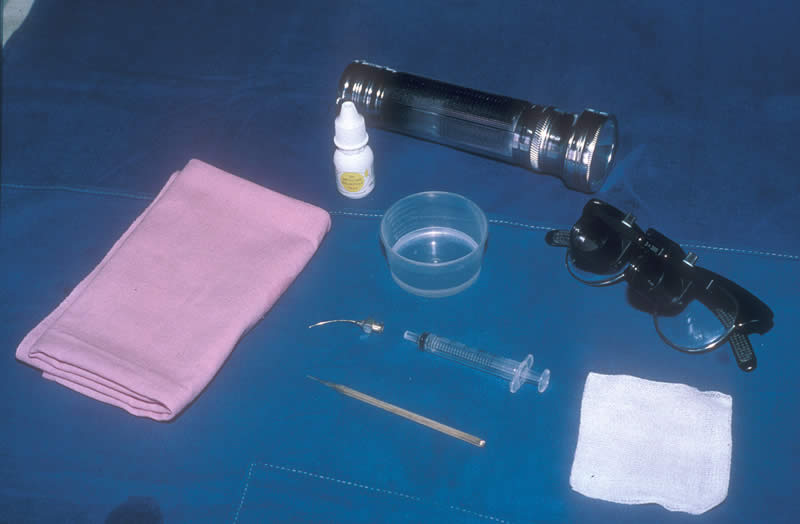
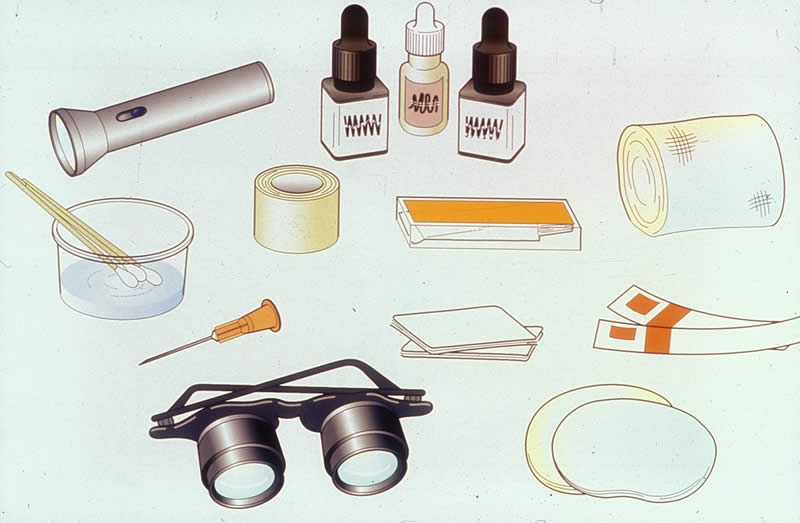
You will need
- Torch
- Magnification
- Normal saline
- Sterile 2ml syringe
- Sterile Nettleship dilator
- Sterile lacrimal cannula
- Local anaesthetic eye drops
- Clean cotton wool or gauze swabs
- Towel
15. Lacrimal syringing (3)
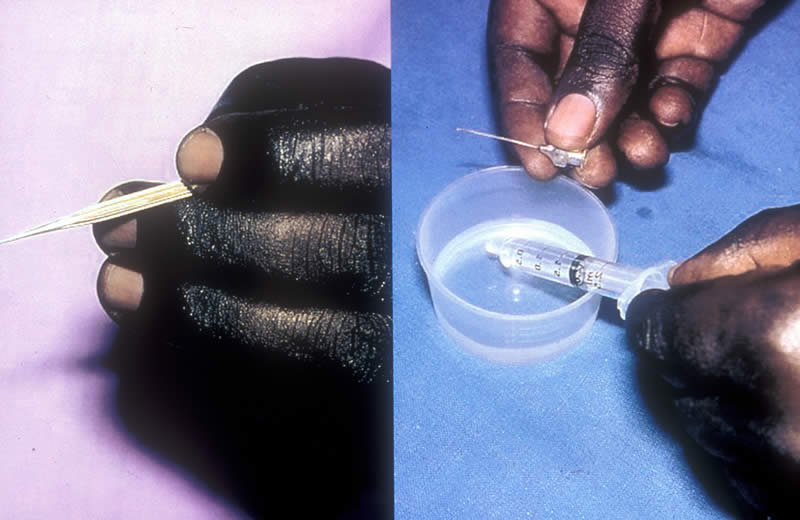
Preparation
Picture left:
- Check the Nettleship dilator – do not use if there is any damage to the tip
Picture right:
- Draw up about 1ml of saline and fix the cannula securely to the syringe
- Position the patient lying with head supported on a pillow or sitting with head against the back of a chair
- Place the towel across the patient’s neck to absorb any fluid spillage from the syringe
16. Lacrimal syringing (4)
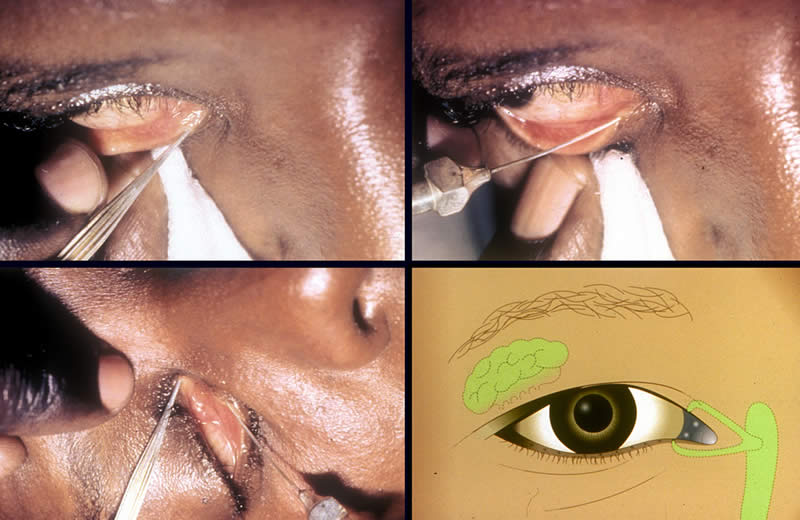
Method:
- Instill local anaesthetic eye drops (this procedure is explained in Practical Opththalmic Procedures – Volume One) but for this purpose allow the drops to fall directly over the lower punctum
- Ask the patient to gaze upwards and outwards and to maintain this until the procedure is finished
Top left picture:
- Gently pull down the lower eyelid to expose the lower punctum
- With the other hand, insert the Nettleship dilator into the lower punctum, following the direction of the lower canaliculus, rotate it gently a few times and then withdraw the dilator
Top right picture:
- Take the syringe and attached cannula and insert the cannula tip into the lower punctum
- Inject the fluid slowly and explain to the patient that they may have the sensation of a salty taste at the back of the mouth and the need to swallow fluid
NOTE: If the patient is not aware of this sensation there may be a blockage in the lacrimal passage. The fluid may come through the upper punctum
Bottom left picture:
NOTE: The next part of the procedure may require 2 people
- Gently raise the top eyelid to expose the upper punctum
- Instill local anaesthetic drops directly over the upper punctum, and lower punctum again, and wait about 30 seconds
- Occlude the upper punctum with the Nettleship dilator
- Repeat the syringing of the lower punctum as before
Bottom right picture:
NOTE: If the patient still does not experience the salty taste and swallow sensation, this will indicate the site of the blockage to be the common canaliculus or the lacrimal sac
- Record the findings in the patient’s documentation
17. Sub-conjunctival injection (1)
Indications
To administer medication in high concentration
- for severe inflammation
- for treating infection
- at the end of an operation
- for dilating the pupil
18. Sub-conjunctival injection (2)
You will need
- Local anaesthetic drops
- Sterile 2ml syringe
- Prescribed medication
- Sterile No. 21 gauge needle
- Sterile No. 25 gauge needle
- Eye pad
- Tape
- Bandage
- Clean cotton wool or gauze swabs
19. Sub-conjunctival injection (3)

Preparation
REMEMBER!
This procedure can be very distressing for the patient and needs sensitive explanation to ensure maximum cooperation
- Position the patient lying comfortably with his/her head supported on a pillow
- Reassure the patient that adequate anaesthetic drops will be instilled before the injection is given
- Instill anaesthetic drops (this procedure is explained in Practical Ophthalmic Procedures – Volume One) at five minute intervals over half an hour – a minimum of 6 drops!
Picture left:
- Away from the patient’s view, draw up the prescribed medication using the No. 21 gauge needle
Picture right:
- Change to the No. 25 gauge needle
20. Sub-conjunctival injection (4)
Method
- Ask the patient to look in the opposite direction and fix gaze
- Choose the site for the injection in the lower or upper fornix and, as appropriate, raise or lower the eyelid
- Tell the patient to expect a slight pressure sensation and keep reassuring him/her
Picture left:
- With the bevel of the needle uppermost, lay the needle against the globe, away from the cornea, and make a ‘pocket’ of conjunctiva
- Insert the needle into the space between the conjunctiva and the sclera
Picture right:
- Ensure the bevel remains under the conjunctiva and inject the fluid slowly to create a ballooning effect
- Withdraw the needle carefully and ask the patient to close the eye – check that the eyelids can close properly
- Dispose of the needle and syringe in an appropriate container
- Hold an eye pad in position for a minute or so – the ballooning will subside
- Apply the eye pad securely and, for maximum comfort, also a bandage (these procedures are explained in Practical Ophthalmic Procedures – Volume One)
- The pad and bandage should remain in position for 2 hours, after which any prescribed topical eye medication may be continued
- Tell the patient that the conjunctiva may appear red and swollen and that the eye may be sore after the anaesthetic drops wear off. Oral Paracetamol x 2 tablets may be given for relief.
21. Removing a corneal foreign body (1)
Indications
To remove superficial material from the surface of the cornea, e.g., metal fragment
22. Removing a corneal foreign body (2)
You will need
- Slit Lamp or magnification and torch
- Fluorescein drops/strips
- Local anaesthetic drops
- Sterile No. 21 gauge needle
- Sterile cotton buds and cooled, boiled water
- Prescribed eye drops or ointment
- 2 eye pads
- Tape
- Bandage
- Clean cotton wool or gauze swabs
23. Removing a corneal foreign body (3)
Preparation
- Position the patient comfortably with head supported – at the Slit Lamp, sitting in a chair or lying down
Method
- Instill local anaesthetic drops (this procedure is explained in Practical Ophthalmic Procedures – Volume One)
- Ask the patient to look straight ahead, fix gaze and keep absolutely still
- With one hand gently control the patient’s upper eyelid (this procedure is explained in Practical Ophthalmic Procedures – Volume Two)
- With the other hand, support the sterile needle with two fingers and the thumb and approach the patient slowly
24. Removing a corneal foreign body (4)

Picture left:
- Hold the needle with the bevel uppermost and horizontally ‘flat on’ to the cornea
Picture right:
- Gently lift off the foreign body (FB) from the corneal surface
NOTE: Sometimes this is possible simply using a sterile cotton bud, moistened with cooled, boiled water, and this is safer practice in less skilled hands
- Wipe the needle with a swab to confirm the FB’s removal and show it to the patient – this will reassure him/her that it has been removed
- Dispose of the needle carefully in an appropriate container
- Check the patient’s eye, carefully everting the upper eyelid (this procedure is explained in Practical ophthalmic procedures vol. 2), to ensure no FB’s remain
- Stain the cornea with Fluorescein drops or strips (this procedure is explained earlier in this volume) – a corneal abrasion may be seen
- Instill prescribed antibiotic ointment and apply 2 eye pads and a bandage (these procedures are explained in Practical Ophthalmic Procedures – Volume One)
- Instruct the patient to leave the padding and bandage in position for 24 hours
IMPORTANT!
If there is any resistance and the FB does not come off easily do not persist! The FB may be deeply embedded and this situation must be referred for further medical attention.
Acknowledgements
This teaching slide set was initiated and prepared by Ms Susan Stevens RGN RM OND FETC, Ophthalmic Resource Coordinator, International Resource Centre, International Centre for Eye Health, London School of Hygiene & Tropical Medicine, London. Refinements were suggested by Dr Murray McGavin and Mrs C Patricia Fathers.
Photographs in this teaching slide set were produced by Dr Murray McGavin and Ms Susan Stevens.
Thanks are due to the following for their help in creating the pictures:-
- Staff of Ruharo Eye Unit, Mbarara, Uganda
- Anita Shah
- Anupa Shah
Many ophthalmic nurses worldwide, too numerous to mention by name, contributed by suggesting ophthalmic procedures for this teaching set programme.
Supported by CBM International, Dark and Light Blind Care, Sight Savers International, Stanley Thomas Johnson Foundation.
© 2004 International Centre for Eye Health, London School of Hygiene & Tropical Medicine, Keppel Street, London WC1E 7HT, United Kingdom